A traditional dish from southern Italy made with fried eggplant, tomato sauce, eggs, herbs and Parmesan cheese.
Time
Prep & Cook: 40 minutes Resting: 1 hour Serves: 4
Ingredients • 1 kg fresh eggplants • 500 g ripe tomatoes • 24 basil leaves • 1 tbsp oregano • 2 garlic cloves • 3 eggs • 1 tbsp chopped parsley • 7 tbsp olive oil • 50 g grated Parmesan • 25 g butter • Frying oil • Salt and pepper
Instructions 1. Slice eggplants and salt them. Let rest 1 hour. Boil eggs 10 minutes, peel and slice. 2. Rinse and dry eggplants, then fry until golden. 3. Preheat oven to 170°C (340°F). Blend tomatoes, add garlic, basil and oregano. 4. Butter a baking dish. Spread tomato sauce, then eggplant, eggs, sauce. Repeat layers. 5. Top with Parmesan and butter. Bake 20 minutes until golden.
A famous Swedish comfort dish made with tender potatoes, onions, creamy sauce and anchovies. Rich, savory and deeply flavorful.
Time
Prep: 20 minutes Bake: 45 minutes Serves: 4
Ingredients • 1 kg waxy potatoes • 16 anchovy fillets in oil • 3 large onions • 75 g butter • 200 ml heavy cream • 150 ml milk • 3 tbsp breadcrumbs • Salt and black pepper
Instructions 1. Preheat oven to 200°C (390°F). Finely chop onions. Drain and chop anchovies. 2. Peel and slice potatoes into thin rounds (5 mm). 3. Melt 40 g butter and sauté onions for 5 minutes without browning. Butter a baking dish. 4. Layer potatoes, onions and anchovies. Season lightly with salt and pepper. Repeat layers, finishing with potatoes. 5. Heat cream and milk and pour over the dish. Sprinkle breadcrumbs and add remaining butter. 6. Bake for 45 minutes until golden and tender.
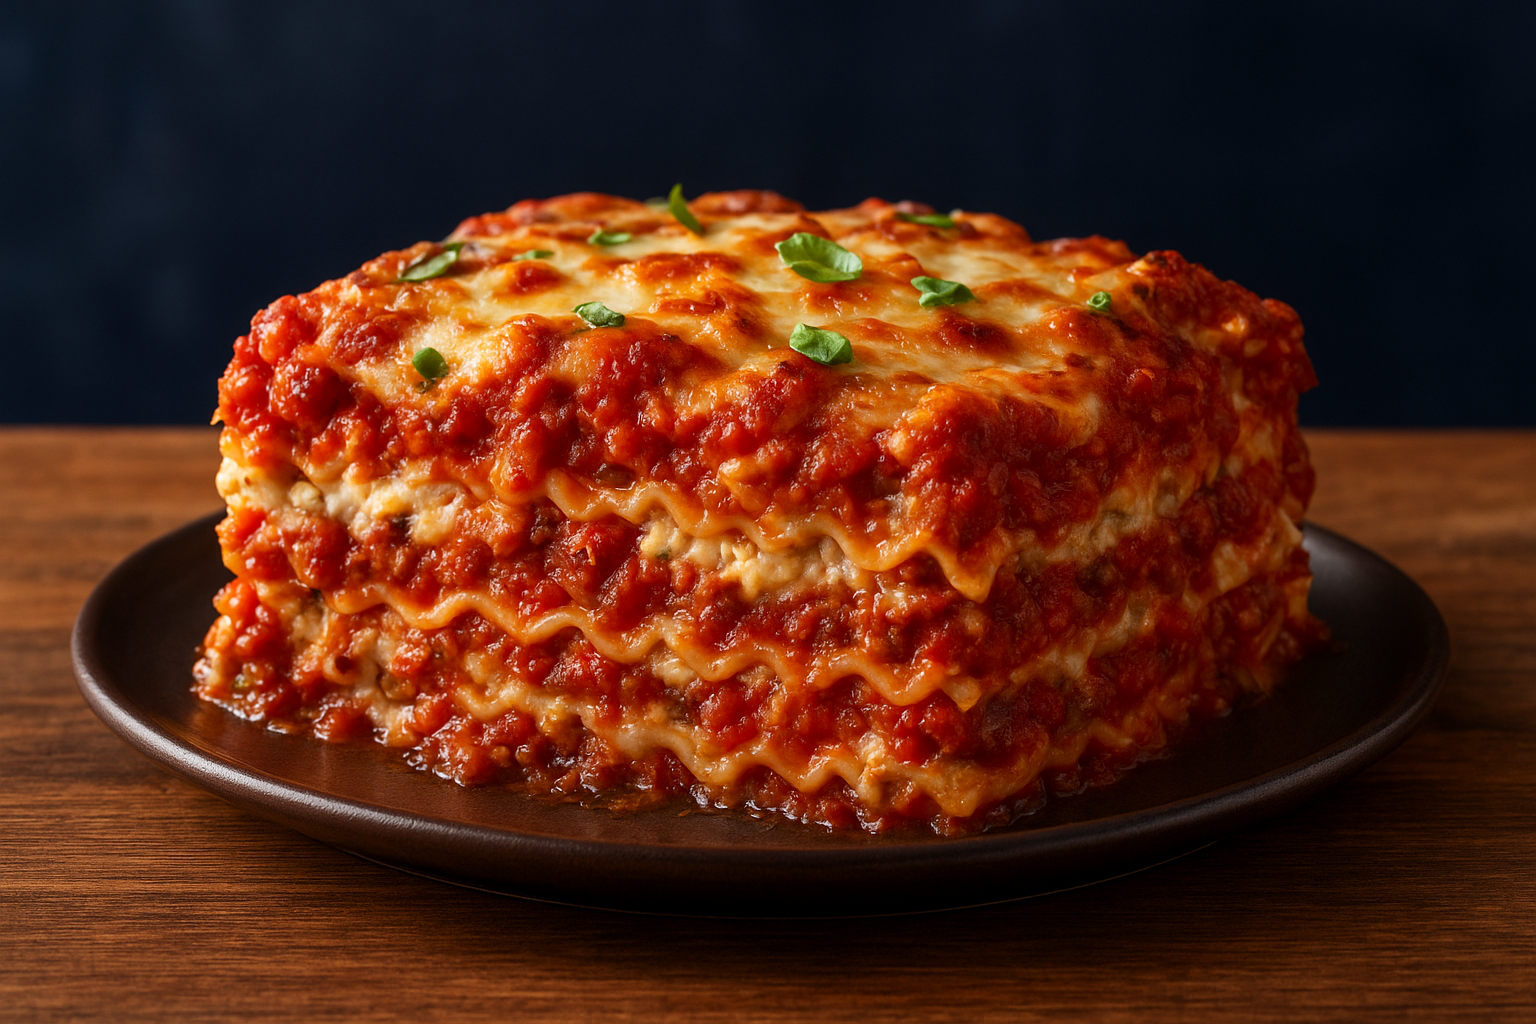
Classic Homemade Lasagna: Layers of Comfort and Tradition
Few dishes capture the heart of home cooking like a classic lasagna. With layers of rich tomato sauce, creamy béchamel, perfectly cooked pasta, and bubbling melted cheese, it’s a meal that embodies warmth, comfort, and love.
Whether it’s for Sunday dinner, a family gathering, or a cozy night in, lasagna has a way of bringing people together around the table. It’s hearty, satisfying, and timeless — the kind of recipe every home cook should have in their collection.
Flavor and Popularity
Why Lasagna Never Goes Out of Style
Lasagna is beloved worldwide because it strikes that perfect balance: savory, creamy, and cheesy with just the right amount of acidity from the tomato sauce. It’s a dish that’s endlessly customizable — from the traditional meat version to vegetarian, vegan, or even seafood adaptations.
Each bite delivers a little bit of everything — the pasta’s softness, the sauce’s richness, and the cheese’s comforting melt. It’s nostalgia and indulgence in perfect harmony.
Ingredients and Preparation
Essential Ingredients:
Ingredient
Amount
Lasagna noodles
12 sheets
Olive oil
2 tbsp
Ground beef (or Italian sausage)
1 lb (450 g)
Onion, diced
1 medium
Garlic, minced
3 cloves
Tomato sauce
3 cups
Tomato paste
2 tbsp
Crushed tomatoes
1 cup
Italian seasoning
1 tsp
Fresh basil, chopped
2 tbsp
Ricotta cheese
2 cups
Egg
1
Mozzarella cheese, shredded
3 cups
Parmesan cheese, grated
½ cup
Salt & pepper
To taste
Step-by-Step Recipe Instructions
Step 1: Cook the Noodles Boil the lasagna noodles in salted water until al dente. Drain and lay flat on a sheet to prevent sticking.
Step 2: Make the Meat Sauce In a skillet, heat olive oil and sauté onion and garlic. Add ground beef and cook until browned. Stir in tomato sauce, paste, crushed tomatoes, Italian seasoning, and basil. Simmer for 20 minutes until thickened.
Step 3: Prepare the Cheese Mixture In a bowl, mix ricotta cheese with egg, a pinch of salt, pepper, and half the Parmesan. Set aside.
Step 4: Assemble the Lasagna In a baking dish, layer as follows:
A thin layer of sauce at the bottom
Noodles
Ricotta mixture
Mozzarella cheese
Meat sauce
Repeat until all ingredients are used, finishing with sauce and mozzarella on top. Sprinkle the remaining Parmesan.
Step 5: Bake to Perfection Cover with foil and bake at 375°F (190°C) for 25 minutes. Remove foil and bake for another 15–20 minutes until golden and bubbly. Let rest for 10 minutes before slicing.
Cooking Tips and Variations
Add spinach or zucchini for a lighter, veggie-packed version.
Use béchamel sauce instead of ricotta for a creamier texture (Italian-style lasagna).
Make it ahead: Assemble and refrigerate overnight, then bake when ready.
Freeze for later: Lasagna freezes beautifully — just thaw before baking.
Health Benefits and Serving Suggestions
Nutritional Highlights:
Protein from beef and cheese.
Calcium from the dairy.
Lycopene from tomato sauce, an antioxidant that supports heart health.
Perfect Pairings:
Garlic bread or focaccia.
A crisp green salad with balsamic dressing.
A glass of red wine like Chianti or Merlot.
FAQ Section
Can I make lasagna without meat? Absolutely! Use layers of roasted vegetables or a rich lentil-tomato sauce.
Can I use no-boil noodles? Yes — just add a little extra sauce to keep the pasta moist as it bakes.
Can I make it gluten-free? Swap regular noodles for gluten-free pasta sheets.
Can I make it ahead of time? Yes! Lasagna tastes even better the next day after the flavors meld together.
Conclusion
This Classic Homemade Lasagna is comfort food at its finest — rich, layered, and deeply satisfying. It’s a dish that speaks of family, tradition, and the joy of sharing a good meal.
Cheesy Mexican Beef and Bean Bake: A Comforting Fiesta in One Dish
This Cheesy Mexican Beef and Bean Bake is the kind of meal that turns an ordinary night into a cozy celebration. The moment it comes out of the oven — bubbling with melted cheese, rich tomato sauce, and fragrant spices — you know you’re about to dig into something special.
It’s everything you love about Mexican comfort food: hearty, spicy, cheesy, and loaded with flavor. Think of it as a quicker, easier cousin to chili con carne — all baked together under a golden layer of cheese.
Classic Homemade Lasagna Recipe
Perfect for family dinners, casual get-togethers, or meal prep, this dish is as satisfying as it is simple.
Flavor and Popularity
Why This Dish Deserves a Spot on Your Table
What makes this bake irresistible is its perfect balance of textures and flavors — tender ground beef, creamy beans, sweet bell peppers, and melted cheese with a touch of spice.
It’s rustic, flexible, and forgiving. Whether you’re feeding a crowd or just using up what’s in the fridge, it always works. You can serve it with rice, scoop it with tortilla chips, stuff it in burritos, or layer it into nachos.
It’s the ultimate comfort food — Mexican style.
Ingredients and Preparation
What You Need for Mexican Beef and Beans
Ingredient
Amount
Ground beef (or chicken, turkey, or pork)
500 g / 1 lb
Red onion (chopped)
1
Green bell pepper (chopped)
1
Red kidney beans (drained)
1 can (400 g / 15 oz)
Tomato passata (or crushed tomatoes)
1 ½ cups
Pickled jalapeños (sliced)
2 tablespoons
Garlic (minced)
2 cloves
Colby or melting cheese (grated)
1 ½ cups
Olive oil
1 tablespoon
Salt & pepper
To taste
The Homemade Mexican Spice Mix
Spice
Amount
Smoked paprika (or regular)
1 teaspoon
Ground cumin
1 teaspoon
Ground coriander
½ teaspoon
Dried oregano
1 teaspoon
Cayenne pepper
¼ teaspoon
Chili powder
1 teaspoon
These pantry staples create that signature Mexican warmth — smoky, spicy, and aromatic without being overpowering.
Step-by-Step Recipe Instructions
Step 1: Sauté the Aromatics Preheat the oven to 190°C / 375°F. Heat oil in an ovenproof skillet. Add onion, garlic, and bell pepper. Cook over medium heat until softened.
Step 2: Cook the Beef Add the ground beef and cook until browned, breaking it up with a spoon as it cooks. Season with salt and pepper.
Step 3: Toast the Spices Sprinkle in the Mexican spice mix. Stir for 1 minute to release the flavors and coat the beef evenly.
Step 4: Add the Base Add tomato passata, kidney beans, and jalapeños. Mix well and bring to a simmer for 5 minutes until slightly thickened.
Step 5: Add the Cheese and Bake Sprinkle grated cheese generously over the top. Transfer the skillet to the oven and bake for 15 minutes, until the cheese is melted, golden, and bubbling.
Step 6: Serve and Enjoy Let it cool slightly, then serve straight from the pan. Garnish with fresh cilantro, green onions, or a dollop of sour cream.
Cooking Techniques and Tips
Use an ovenproof skillet to go seamlessly from stovetop to oven.
Toast your spices — it deepens flavor instantly.
Mix up the protein — chicken, turkey, or even lentils all work beautifully.
Top with extras — avocado slices, crushed tortilla chips, or a drizzle of lime crema.
Health Benefits and Serving Suggestions
Nutritional Highlights:
High in protein from beef and beans.
Packed with fiber and antioxidants from vegetables and spices.
Naturally gluten-free and easy to adapt for different diets.
Perfect Pairings:
Steamed rice or Mexican-style rice.
Warm tortillas or crunchy tortilla chips.
A side of guacamole or pico de gallo.
FAQ Section
Can I make it ahead of time? Yes! Assemble it up to the baking step, refrigerate for up to 24 hours, then bake when ready.
Can I freeze it? Absolutely. Cool completely, cover, and freeze for up to 2 months. Reheat in the oven until bubbly.
Can I make it vegetarian? Yes — swap the beef for cooked lentils, extra beans, or diced vegetables like zucchini and mushrooms.
Conclusion
The Cheesy Mexican Beef and Bean Bake is comfort food at its finest — rich, hearty, and bursting with flavor. It’s the perfect one-pan wonder for busy nights when you want something easy but deeply satisfying.
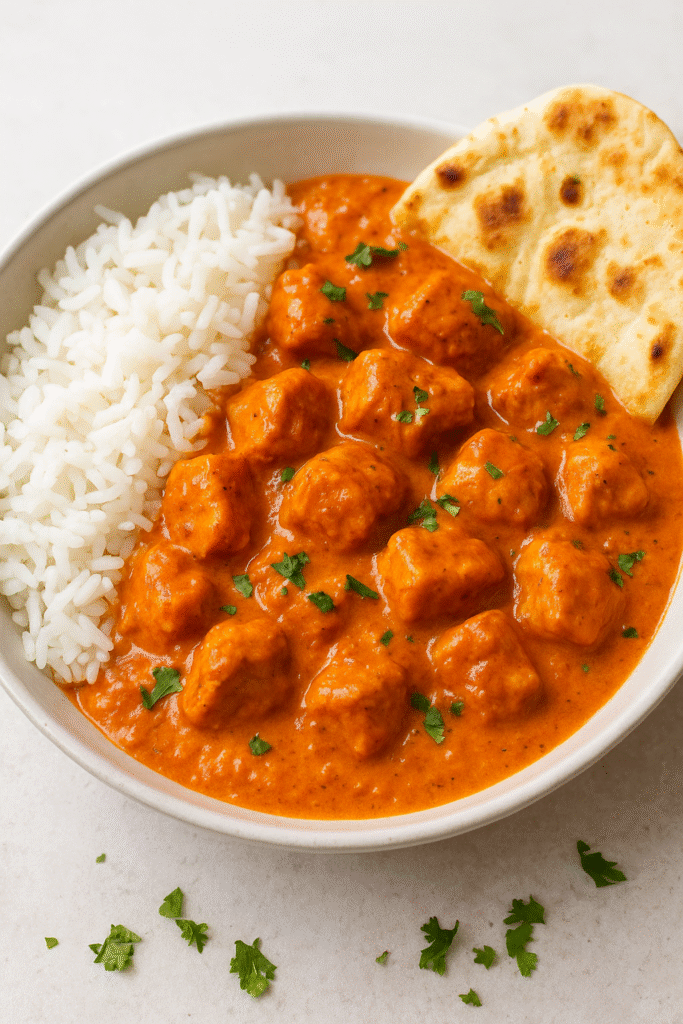
Easy Indian Butter Chicken: A Creamy Classic Full of Flavor
Indian Butter Chicken — or Murgh Makhani — is one of those dishes that instantly warms your heart. The first time I made it, the scent of caramelized onions, garam masala, and rich cream filled my kitchen with the promise of something extraordinary.
This dish is a celebration of balance — tender chicken pieces in a silky, spiced tomato-cream sauce. It’s comforting, flavorful, and surprisingly easy to make at home. Whether you serve it with rice, naan, or even couscous, it’s always a crowd-pleaser.
Easy Indian Butter Chicken
Flavor and Popularity
Why This Dish Captivates the World
Butter chicken is loved across the globe because it strikes the perfect harmony between spice and creaminess. It’s rich but not heavy, flavorful yet mild enough for everyone at the table.
From Indian restaurants in London to home kitchens in New York, this dish has become a universal favorite — the kind of comfort food that feels indulgent yet deeply familiar.
Ingredients and Preparation
Essential Ingredients and Substitutions
Ingredient
Amount
Butter, divided
1 cup
Onion (minced)
1
Garlic (minced)
1 tablespoon
Tomato sauce
1 (15 oz) can
Heavy cream
3 cups
Salt
2 teaspoons
Cayenne pepper
1 teaspoon
Garam masala
1 teaspoon
Chicken breast (skinless, boneless, bite-sized)
1 ½ pounds
Vegetable oil
2 tablespoons
Tandoori masala
2 tablespoons
Substitutions:
Use coconut cream instead of heavy cream for a dairy-free option.
Replace chicken breast with thighs for extra tenderness.
Add a pinch of smoked paprika for depth.
Step-by-Step Recipe Instructions
Step 1: Preheat and Prepare Preheat your oven to 375°F (190°C). Gather all ingredients before starting.
Step 2: Caramelize the Onions Melt 2 tablespoons butter in a skillet over medium heat. Add minced onion and garlic. Cook slowly, stirring often, until deeply caramelized — about 15 minutes.
Step 3: Build the Sauce In a separate saucepan, combine the remaining butter, tomato sauce, cream, salt, cayenne pepper, and garam masala. Bring to a gentle simmer over medium-high heat. Reduce to medium-low, cover, and simmer for 30 minutes, stirring occasionally. Add the caramelized onions to the sauce.
Step 4: Roast the Chicken While the sauce simmers, toss chicken pieces with vegetable oil and tandoori masala. Spread evenly on a baking sheet and bake for 12 minutes, until fully cooked and no longer pink inside.
Step 5: Combine and Finish Stir the baked chicken into the sauce. Simmer gently for 5 minutes to allow the flavors to blend.
Step 6: Serve and Enjoy Serve hot with fluffy basmati rice and warm naan. Garnish with chopped cilantro for color and freshness.
Cooking Techniques and Tips
Caramelize patiently — slow cooking the onions brings natural sweetness and depth.
Don’t rush the sauce — simmering develops the creamy, velvety texture butter chicken is known for.
Adjust spice — add more cayenne for heat or reduce it for a milder version.
Health Benefits and Serving Suggestions
Nutritional Highlights:
High-quality protein from chicken.
Antioxidants from tomatoes and spices.
Calcium from the cream or yogurt (if substituted).
Perfect Pairings:
Steamed basmati or jasmine rice.
Garlic naan or roti.
A side of cucumber raita or mango chutney.
FAQ Section
Can I make it ahead of time? Yes! In fact, the flavors deepen overnight. Reheat gently on the stove before serving.
Can I make it lighter? Use half-and-half or yogurt instead of heavy cream.
Can I freeze it? Absolutely. Let it cool, then store in an airtight container for up to 2 months.
Conclusion
Easy Indian Butter Chicken is a masterpiece of comfort — velvety, aromatic, and full of flavor. It’s proof that with a few pantry staples and some patience, you can create a restaurant-worthy meal right at home.
Creamy, comforting, and irresistibly good — this butter chicken will become one of your go-to dinner favorites.
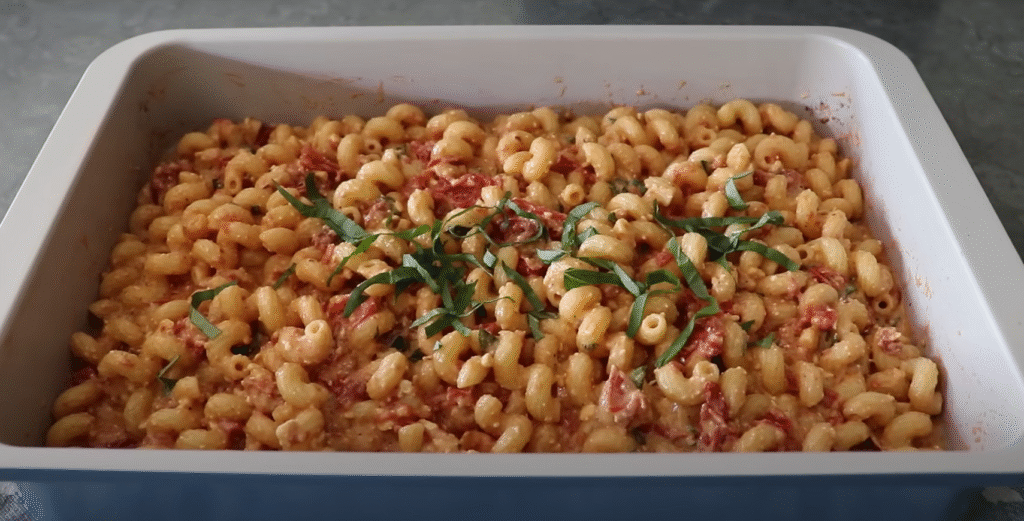
Viral Baked Feta Tomato Pasta: A Creamy Mediterranean Dream
The first time I made the famous Baked Feta Pasta, it wasn’t in a fancy kitchen—it was a cozy Sunday evening during lockdown, scrolling endlessly on TikTok. Suddenly, I stumbled upon this colorful tray of bubbling cherry tomatoes and melting feta. I had to try it.
As I pulled it out of the oven, the smell alone was enough to transport me straight to a little café on the Greek coast. The creamy feta mingled with roasted tomatoes, garlic, and olive oil—pure comfort in every forkful. It’s amazing how something so simple could feel so luxurious.
Flavor and Popularity
Why This Pasta Went Viral
Viral Baked Feta Tomato Pasta took social media by storm for good reason. It’s a dish that perfectly combines convenience with flavor. With only a handful of ingredients—tomatoes, feta, garlic, olive oil—it transforms into a luscious sauce that feels homemade and gourmet at the same time.
The flavor profile is irresistible: tangy feta cheese softens into a creamy sauce, balancing the sweetness of roasted cherry tomatoes and the aromatic kick of garlic. Add your favorite pasta, a drizzle of olive oil, and a sprinkle of basil, and you have a restaurant-quality dinner ready in under 30 minutes.
This viral sensation became more than just a recipe—it became a shared experience. People all over the world cooked it, posted it, and reinvented it with their own twists: spicy versions, vegan alternatives, even baked feta gnocchi!
Ingredients and Preparation
Essential Ingredients and Substitutions
Ingredient
Amount
Feta cheese (block)
200 g
Cherry or grape tomatoes
400 g
Garlic cloves (sliced)
3–4
Olive oil
2 tbsp
Pasta (spaghetti, penne, etc.)
200–250 g
Salt & black pepper
To taste
Red pepper flakes (optional)
½ tsp
Fresh basil leaves
For garnish
Substitutions:
For a vegan version, use vegan feta or cashew cheese.
You can substitute cherry tomatoes with regular tomatoes cut into chunks.
Add spinach or kale at the end for extra nutrition.
Step-by-Step Recipe Instructions
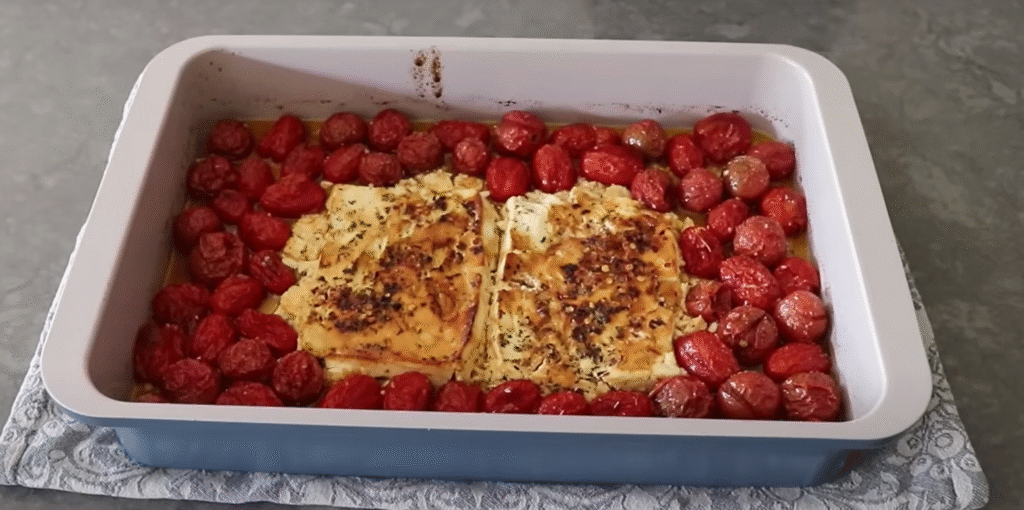
Step 1: Prepare the Base
Preheat your oven to 200 °C (400 °F). In a baking dish, place the block of feta in the center and surround it with cherry tomatoes and sliced garlic.
Step 2: Season and Bake
Drizzle everything with olive oil, then season with salt, pepper, and red pepper flakes if you like it spicy. Bake for 30 minutes, until the tomatoes burst and the feta softens beautifully.
Step 3: Cook the Pasta
While the feta and tomatoes bake, cook your pasta in salted boiling water until al dente. Save about ½ cup of the pasta water before draining.
Step 4: Create the Sauce
Remove the dish from the oven and mash the feta and tomatoes together with a fork. Add a little pasta water to create a creamy consistency.
Step 5: Combine and Serve
Toss your pasta into the sauce until evenly coated. Garnish with fresh basil and a drizzle of olive oil. Serve immediately and enjoy the magic!
Cooking Techniques and Tips
Don’t crumble the feta beforehand — baking it whole allows it to melt and caramelize perfectly.
Use good-quality olive oil for maximum flavor.
If your sauce feels too thick, add pasta water gradually until creamy.
For a twist, mix in a spoonful of pesto or chili oil before serving.
Health Benefits and Serving Suggestions
Nutritional Highlights
This dish is not just comfort food—it’s also nutrient-rich:
Feta cheese provides calcium and protein.
Tomatoes are loaded with antioxidants and vitamin C.
Olive oil adds heart-healthy fats.
Add veggies like spinach or zucchini for extra fiber and color.
Perfect Pairings
Pair your Viral Baked Feta Tomato Pasta with:
A fresh arugula salad with lemon vinaigrette.
Garlic bread for a cozy, indulgent meal.
A chilled glass of white wine or sparkling water with lemon.
FAQ Section
Can I make this with crumbled feta? Yes, but the creamy texture won’t be quite the same—whole feta melts better.
How can I make it spicy? Add red pepper flakes, chili oil, or even a bit of harissa paste for a bold kick.
Can I store leftovers? Absolutely. Keep leftovers in an airtight container for up to 2 days. Reheat with a splash of water or olive oil to restore creaminess.
Can I use other cheeses? Yes! Goat cheese or ricotta also work well, though the flavor will differ.
Conclusion
The Viral Baked Feta Tomato Pasta isn’t just a recipe—it’s a story of simplicity turned into sensation. It’s proof that a few humble ingredients can come together to create something extraordinary. Whether you’re cooking for yourself, a date night, or a casual dinner with friends, this dish will never disappoint.
So next time you need a comforting, beautiful meal that’s social-media-worthy, try this viral wonder. Snap a photo, share it online, and join the delicious trend that took the world by storm! 🍝✨
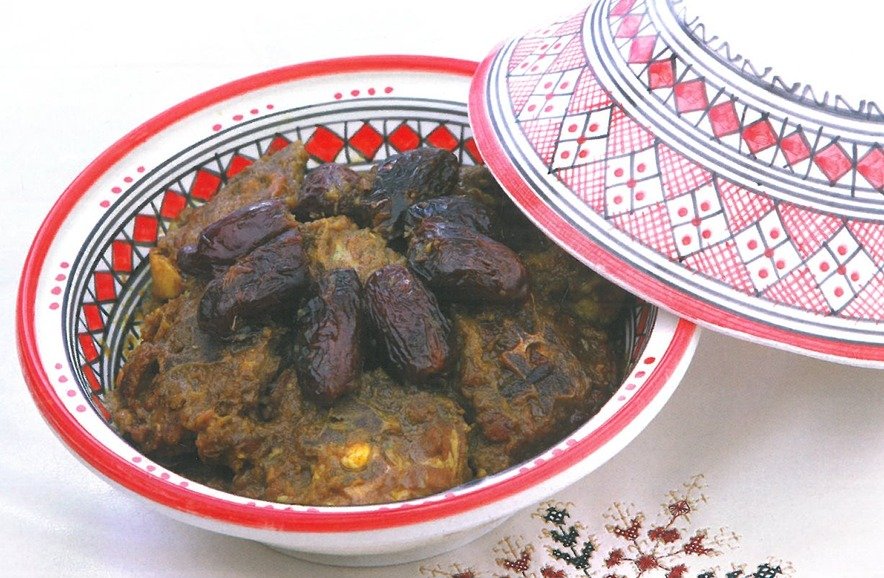
טאג׳ין סיר טאג׳ין מסורתי עם בשר טלה רך, תמרים מתוקים ורוטב זהוב, מקושט באגוזי מלך קלויים
למה להכין את הטאג׳ין הזה
טאג׳ין טלה עם תמרים הוא מתכון חגיגי ומפנק שמגיע היישר מהמטבח המרוקאי. השילוב בין בשר טלה רך, תמרים מתוקים, דבש ותבלינים חמים כמו קינמון, זעפרן וג’ינג’ר יוצר מנה עשירה ומיוחדת. זו מנה אידיאלית לארוחת חג, שבת או מפגש משפחתי – מלאה בטעמים, ניחוחות ואווירה.
תוכן העניינים
למה להכין את הטאג׳ין הזה
איך להכין את הטאג׳ין
איך להגיש את הטאג׳ין
איך לשמור את הטאג׳ין
טיפים להצלחה
וריאציות
שאלות נפוצות
איך להכין את הטאג׳ין
מרכיבים :
600 גרם צוואר טלה
600 גרם בצל
4 שיני שום
40 גרם שמן זית
1 כפית ג׳ינג׳ר
1 כפית קינמון
1 כפית כורכום
כמה חוטי זעפרן
3 כפות דבש
500 גרם תמרים מגולענים
חצי כוס אגוזי מלך לקישוט
הוראות הכנה :
קוצצים את הבצל והשום ומאדים עם שמן זית.
מוסיפים את הבשר החתוך לקוביות גדולות יחד עם כל התבלינים, ומבשלים כשעה על חום בינוני עד שהבשר מתרכך.
מוסיפים את התמרים והדבש, מבשלים עוד כ־35 דקות עד שהרוטב מצטמצם.
מגישים חם, מעוטר באגוזי מלך קלויים.
איך להגיש את הטאג׳ין
מומלץ להגיש את הטאג׳ין בסיר חרס מסורתי, עם אגוזי מלך קלויים מעל. אפשר להגיש לצד קוסקוס, אורז לבן או לחם טרי לספיגת הרוטב המתוק-מלוח.
איך לשמור את הטאג׳ין
לאחר שהטאג׳ין מתקרר לטמפרטורת החדר, שמרו בקופסה אטומה במקרר עד 3 ימים. ניתן גם להקפיא במנות אישיות עד חודשיים. בחימום מחדש, הוסיפו מעט מים או ציר כדי להחזיר את הלחות לרוטב.
טיפים להצלחה
צרבו את הבשר כמה דקות לפני הבישול להעצמת הטעמים.
הוסיפו פלפל שחור גרוס להעמקת הטעם.
אפשר לקלות את אגוזי המלך מראש להגשה יותר פריכה.
וריאציות
ניתן להחליף את התמרים בשזיפים מיובשים או משמשים מיובשים.
אפשר להשתמש בעוף במקום טלה – זמן הבישול יתקצר ל־45 דקות.
לטעם עשיר במיוחד, הוסיפו מעט יין מתוק או ציר עוף.
שאלות נפוצות
1. האם חייבים להשתמש בבשר טלה? לא, ניתן להשתמש בבקר או בעוף – אך טלה נותן את הטעם המסורתי ביותר.
2. אפשר להכין את הטאג׳ין מראש? בהחלט. הטאג׳ין אפילו משתבח למחרת, כשהטעמים נספגים טוב יותר בבשר וברוטב.
3. אין לי זעפרן – במה אפשר להחליף? אפשר להוסיף כורכום נוסף או מעט פפריקה מתוקה לטעם וצבע נהדרים.
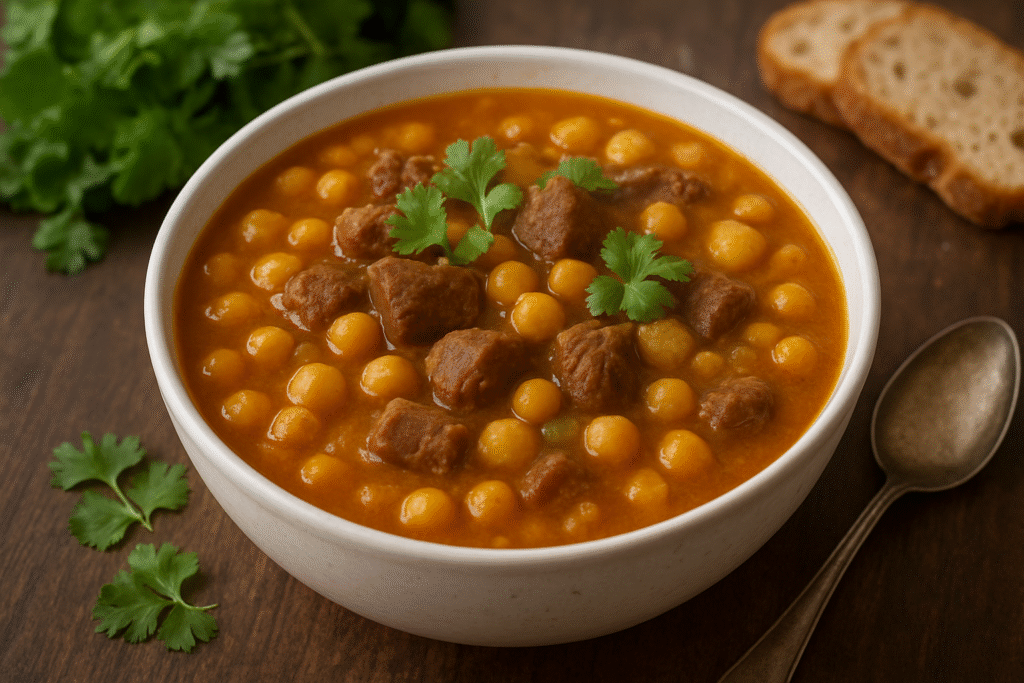
מרק חומוס ובשר הוא מתכון מסורתי, עשיר בטעמים ומזין במיוחד. השילוב בין החומוס הרך, הבשר העסיסי והתבלינים כמו כורכום, זעפרן ושמן זית יוצר מנה מושלמת לימי חורף קרים או לארוחה משפחתית חמימה. קל להכנה, משביע וטעים – מתכון שכל אחד צריך להכיר.
תוכן העניינים
למה להכין את המרק הזה
איך להכין את מרק החומוס והבשר
איך להגיש את המרק
איך לשמור את המרק
טיפים להצלחה
וריאציות
שאלות נפוצות
איך להכין את מרק החומוס והבשר
מרכיבים
250 גרם בשר בקר
200 גרם חומוס יבש שהושרה לילה במים
1 בצל בינוני (50 גרם)
1 תפוח אדמה קטן (50 גרם)
2 שיני שום
חבילה קטנה של כוסברה
1 כפית כורכום
כמה חוטי זעפרן
30 גרם שמן זית
½ כפית פלפל שחור
1 כפית מלח
1 ליטר מים
הוראות הכנה
השרו את החומוס במים למשך לילה.
קצצו את הכוסברה ושמרו כף אחת בצד לקישוט.
טחנו את הבצל והשום והכניסו לסיר יחד עם החומוס, תפוח האדמה, הבשר ושאר התבלינים.
הוסיפו את המים ובשלו על אש בינונית כ־40 דקות, עד שהחומוס והבשר מתרככים.
הוציאו את הבשר, טחנו את המרק בעזרת בלנדר עד לקבלת מרקם חלק.
החזירו את הבשר החתוך לקוביות והוסיפו את הכוסברה הטרייה.
איך להגיש את המרק
הגישו חם בקערות עמוקות, עם נגיעה של שמן זית מעל וכוסברה קצוצה. מומלץ להגיש לצד פיתות חמות, חלה טרייה או לחם כפרי.
איך לשמור את המרק
השאירו את המרק להתקרר לטמפרטורת החדר, ולאחר מכן אחסנו בקופסה אטומה במקרר עד 4 ימים. אפשר גם להקפיא במנות אישיות. בעת החימום, הוסיפו מעט מים במידת הצורך.
טיפים להצלחה
טגנו את הבשר קלות לפני הבישול להעצמת הטעם.
הוסיפו קמצוץ ג’ינג’ר טרי בשביל טעם רענן.
סחטו מעט לימון מעל המרק לפני ההגשה – זה מאזן את הטעמים בצורה נהדרת.
וריאציות
אפשר להחליף את בשר הבקר בעוף, ולקצר את זמן הבישול ל־30 דקות.
לגרסה צמחונית – השמיטו את הבשר והוסיפו ירקות כמו גזר, קישוא וסלרי.
שאלות נפוצות
1. האם אפשר להשתמש בחומוס משומר? כן, אפשר להשתמש בחומוס משומר ולהקטין את זמן הבישול ל־20 דקות בלבד.
2. אין לי זעפרן – מה אפשר לשים במקום? אפשר לשים פפריקה מתוקה או כמון, לטעם שונה אך טעים.
3. האם אפשר להכין את המרק מראש? בהחלט! המרק נשמר היטב במקרר וגם בהקפאה, ומתאים לבישול מראש.